On this train was a mother with two kids - a very young girl and an older boy. The young girl had a colouring book which came with a set of those 'magic' colour-change pens and, bizarrely, a pair of red/blue 3D glasses (as recently made cool by David Tennant's interpretation of Doctor Who). Evidently, the book proclaimed that one could create 3D images with the pens included... but possibly didn't explain how one might accomplish this. The little girl repeatedly drew things out in all the different colours, then put on the glasses to see if the picture was 3D yet. Nothing seemed to work for her. Not even the 'magic' colour-changing pen could turn her drawings into 3D.
So her brother snatched it all away, proclaiming that he knew how to make a 3D drawing. He took the black pen, drew a cube in perspective, then coloured one face red, and another blue. Then he put on the 3D glasses.
It didn't work. I was biting my tongue by this point.
So, Stereoscopic Photography 101:
Human sight relies on two offset eyes to achieve perception of three dimensions. This is the first clue as to how to create a 3 Dimensional image on a flat surface. Each eye is seeing from a slightly different perspective, and the brain combines these two images into one. You can see this by looking at something, then closing one eye at a time.
Consider now the red/blue lenses. The red lens floods one eye, making red effectively imperceptible. Everything is red. Through the red lens, blue appears darker. The blue lens floods the other eye, making blue effectively imperceptible. Everything is blue. Through the blue lens, red appears darker.
Consider how these two concepts relate to each other. Each eye sees something different, and red/blue lenses make red/blue imperceptible respectively and blue/red more obvious respectively.
With me so far?
Take a greyscale photograph. It's flat. There is very little indication of depth. But now take another greyscale photograph of the same thing, from a slightly different horizontal position, and you have the beginnings of 3D.
At this point, you'll need some form of image manipulation software. If you're familiar with the likes of Photoshop or Paint Shop Pro, this is a doddle.
Assign a colour to each eye. These things tend to be Red/Left and Blue/Right but, hey, I cocked up and did it the other way round. It really doesn't matter, so long as you are consistent, and remember which way round you're doing things.
Using the time-honoured method of closing each eye alternately, determine which picture applies to which eye, thereby deciding which colour applies to which picture.
Initially, you'll need to create an RGB image with your 'red' image on the Red channel and the 'blue' image on the blue channel. This will work as it is, but lacks contrast. To regain your contrast and make a nice, monochromatic 3D image, you'll need to utilise the green channel.
The green channel needs to show both images but, once merged, they don't need to be as dark as either the red or blue channels. I tend to Multiply them together at about 50% opacity, varying one or the other to achieve a good balance.
Once your three channels are set up, view the final RGB image, and don your red/blue 3D glasses. If the image you're looking at doesn't look 3D, try wearing the glasses the other way round. Hopefully, you're looking at something like this (and remember that, as previously noted, you'll need Blue/Left and Red/Right to see these properly):
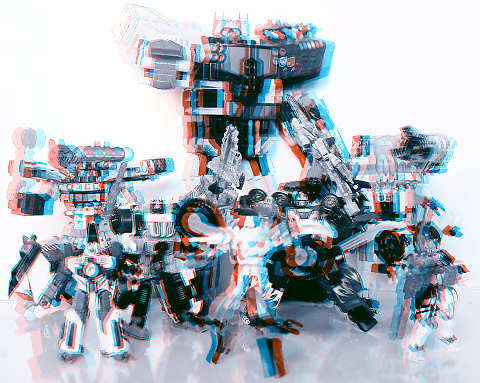

Through a process of fine-tuning, you'll figure out how best to take the photos and how best to combine them into a 3D image. The above images have a very well-defined 'mid-ground', and that is what I used as the point of focus (where the Red/Blue overlaps most perfectly). You can make things more dramatic (Red/Blue overlaps in the background) or deeper (Red/Blue overlaps in the foreground), but you will find that the difference in position when taking the photograph will have to be quite minimal.
Enjoy!
1 comment:
Nice post and this enter helped me alot in my college assignement. Say thank you you for your information.
Post a Comment